3D Spiderman Cake Tutorial
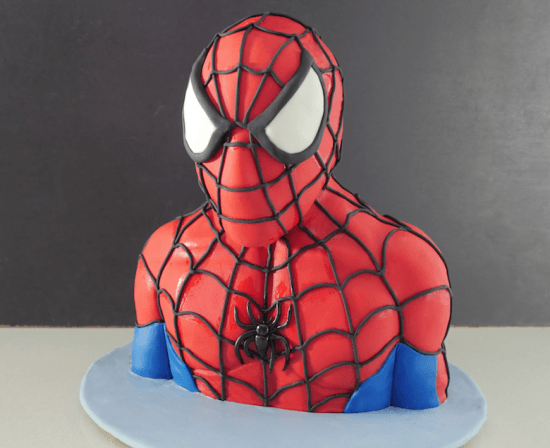
Spiderman, Spiderman, does whatever a spider can. Okay, but can a spider make kids squeal with delight? Can a spider be sliced up and eaten and leave people asking for more? Well, this Spiderman cake can!
This week I had the privilege of going to the YouTube Creator Summit in New York. Yes, Pewdiepie and Superwoman were there, along with about 150 other top YouTubers but the person I was the most excited to meet was JOHN GREEN. An old-school YouTuber, he also wrote the very popular novel and now movie, The Fault In Our Stars (see the cake here). So as you can imagine I was OVER THE MOON when John asked for a copy of our book The Deep Enders and said he was looking forward to reading it! That in itself made the 24 hours of travel from Australia to NY totally worthwhile.
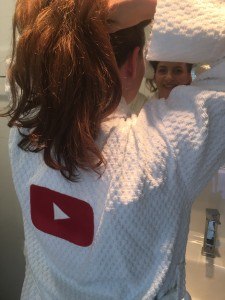
Big thanks to YouTube for thoroughly spoiling us with gifts on arrival and each morning, I love my new bathrobe with the embroidered YouTube play-button!
To make this spiderman cake you will need:
Spiderman cake template

Cake
One and half times my Rich Chocolate Cake Recipe baked in two trays. My trays are 38.1cm (15 inches) x 25.4cm (10 inches).
Frosting
A double quantity of my chocolate buttercream recipe.
Simple Syrup
1/4 cup or 54g (1.9 ounces) sugar
1/4 cup 63millilitres (2.13 fluid ounces) water
Heat until the sugar is dissolved and allow to cool. Flavor with vanilla if desired.
Rice crispy treats
200g (7.05 ounces) or 2 ¼ cups Marshmallows
200g (7.05 ounces) or 6 ¼ cups rice bubbles
Fondant
750g (26.46 ounces) Red fondant
100g (3.53 ounces) Black fondant
100g (3.53 ounces) Bright blue fondant
250g (8.82 ounces) Pale blue fondant (optional for covering the board)
Other stuff
13in (33.02 centimetres) Round Cake board
Centre cake support
fondant extruder (optional but makes the job easier I have this one)
Day 1.
Bake your cakes, allow them to cool. Wrap in plastic wrap so they stay fresh. Mix up a double batch of frosting. Make the simple syrup and leave to cool.
Make the rice crispy treat and follow the directions in the video to make the shape of spiderman’s head.
Day 2.
Cut out the template and use it as a guide to cut out the layers of cake.
Spread some frosting on the base board to stop the cake slipping and add the first layer. Spread that layer with some simple syrup to keep the cake moist and then another layer of frosting. Then continue in this way all the way up to layer seven.
Carve the cake as shown in the video and then cover the whole thing in frosting following the shape of the cake. Place it in the fridge for at least 30 minutes for the frosting to chill.
Cover the head in a thin layer of buttercream and add it to the top of the cake. Then use some frosting to smooth the join at the neck.
Make a long raindrop of red fondant and add it to the front of his face. Flatten it to make his nose and chin.
Add a short snake of red going across where his clavicle bone would be then wrapping it up and around where the neck muscle is.
The roll out a large sheet of red fondant and use it completely cover spidermans face and body using your hands to lift and smooth it around his shape.
Then trim off the exces around the base and make it neat.
Using a fondant extruder make a long skinny snake of black and use it to make the spider web pattern over his face and body.
Use the template to make the spider and place that in the freezer for 10 minutes to make it easier to transfer. To make the eyes cut around the template in white fondant. Add a little water around the edge then add a strip of black all the way around the outside of the eye.
Then using a little water add the eye into place on spider mans face.
On the base of this arm add the strip of blue and trim it off. Take the spider out of the freezer, peel off the baking paper and add it to the centre of spider mans chest.
Using the colour of your choice cover the cake board in fondant.
Remember to take a photo of your birthday child with the cake before the party starts, it’s very hard to get a good shot once all the kids are crowding around the cake.
Make it a great week!
My Cookbook

Stores that sell my book listed by country:
http://bit.ly/ARcookbook
All recipe quantities in the book are in grams, ounces and cups.


Hi Ann. I am having a really hard time shaping the head. Is there a easier way?
Hi Dee, I am not the best at shaping heads, but I find if I make a rough egg shape first and then adjust from there it works a treat.
Hi Anne,
What kind of support are you using for the body? Where can I get it and what are the alternatives?
Thanks
HI Tash, You can see this in the video. Ann uses plastic cake supports. You can also use cake pop sticks.
I made this for my nepew
Awsome work!
Anne are the templates suppose to be as small as my hands? I only have access to a regular sized printer and 11 inches x 8 in paper.
Hi Ashley, just ensure that your printer is set to print at 100%. The template will then print over several pages & you can simply tape it together in the proper size. Hope that helps 🙂
How tall will the cake be? Looking for a box with the correct dimensions for transporting the cake.
Hi Robert Use your template as a guide and add that to the board height etc. A box that is 35cm should be fine.
I made the head and put it in the freezer over night. I took it out today and it started falling apart. Any tips on how to keep the rice crispy sticking together.
Hi Kate, This problem doesn’t usually happen as the rice crispy head becomes quite solid. Perhaps try a different brand of marshmallows or use a few more.
Hi Ann! Can I post photos in my Facebook page for people to buy the cakes.
Thanks, I love your cakes!
Hi Evelyn. I am unsure what you are asking but if you are placing photos of your own cakes on your own facebook page then of course that is permissible.
It is not ok to copy Ann’s photos and use them on your page for promotional purposes. That is a breach of copyright.
If you want to give your clients ideas for cake options, then it would be better to put a link on your page that refers people to the How to Cook That website. Or you can ‘share’ any of Ann’s posts on your feed. Ann doesn’t make cakes that are made to order so it is a great place to refer people for ideas.
Got it. Thanks for your explanation.
Thanks for the amazing tutorial and template. We had a go at making this for our nephew’s 3rd birthday and we very much envy your head-shaping abilities…
Hi Nikk & Adrian. You did great! I bet your nephew loved his cake!
Thanks for the tutorial. I had to add fondant in different pieces coz a big sheet kept breaking. This process is becoming addictive. Just can’t make simple ordinary cakes anymore despite it being so tiring and time consuming to do the more elaborate ones.
Here comes the photo
Hello,
I have purchased the Spider-Man template, but no matter what settings I use/ paper size/ layout, it does not print as large as your demo video.
I have made sure to print horizontally (after initially printing vertically and it was reeeeeally small ha ha), but even when printed horizontally, it is only about 3/4 of the size you show.
What else can I try????
And there is no option for printing at “100%”…
Hi Nicole, Print on A4 paper without scaling. Prints usually have a scaling option eg. Scale to ‘fit the page’ or page width. As long as that is unchecked so the printer prints at actual size, then it should print out properly.
How tall does the center cake support have to be?
Hi Bia, You can refer to the template as a guide. You will want the support to go half way into spiderman’s head. Ann uses a stick here that is about 20cm long. You can trim them if necessary.
Hi Ann how would u change this template to make a spider woman or a bat woman cake
Hi Sharon, There would be two major changes you would need to make. Firstly the chest and shoulders of the figure would need to have a more feminine shape. The second relates to the decoration of the face. Designs for both those characters vary but generally they don’t wear a full mask. Eyes, mouth and chin are readily seen, so you would need to shape and decorate the face to suit the design. Spiderman is a little easier because his entire face is masked.
My wife made this for our sons 4th birthday tomorrow. I think she did a fantastic job! Thanks for the idea.
Hi Laura Jo, this spidey cake looks amazing! Well done!
Hi Ann,
Thanks for the detailed tutorial. Made this cake for my son’s 5th b’day and he and his friends were so thrilled! Got rave reviews as well.
awesome job, you’re a great Mum 🙂
Hi i am looking forward to making the spiderman cake but i am struggling to find where the printable templates are.
Any help would be much appreciated.
Thank you. X
Hi Danielle,
They are purchasable using the Buy it now button or on the shop page.
How do I pay for the template? Thanks 🙂
I love your kitchen; it’s so neat and clean. Everything’s so white! i want to have a kitchen like yours someday. 🙂 can you show me every detail of your house with a new kitchen tour showing everything in your kitchen? Thank you:) 🙂
Hi Rogen WL, If you click on the Buy it Now Button, You will be linked to payment options.
Hi again Ann…forgot to ask how many people would this cake feed..not sure if I should add cupcakes?! It is hard to tell the size of it. Thank you
Lori
Hi Lor, The finished cake could serve 20 people depending on how large you want the serves to be. To make this cake you do shave a lot of cake off, so if you used the scraps to make cake pops as well you would have at least 36 serves altogether.
Hello…I love this cake…if I order now is your spider-man template delivery quick? I have my sons party in just under a month!!
Thanks!
Hi Lori, When you purchase templates you can download them immediately.
hey i need you help!!!!
i want to make the cake bigger then you did, i paid for the stencils and i find them a bit small for the size of cake i want to make !!!!!!! HELP
Hi Adrian, Print the stencils at 100% (no scaling) to make the cake at the size shown in the video.
Hi! I love your video, I was wondering where can I get the stencils to make the cake, I can’t find them, thank you so much! 🙂
hi monserrat, just click on the ‘Buy it now’ button on this post 🙂
Hi Ann, I am not sure what size to print out the stencils, is it A4, A3, A2 etc? Thanks, Mette
Hi Mette, The templates are designed to print on a4 paper but if you print them at 100% without scaling it will print at the c correct size no matter what size paper you use.